You must be signed in to read the rest of this article.
Registration on CDEWorld is free. You may also login to CDEWorld with your DentalAegis.com account.
Removable prosthetic options for implant dentistry can be somewhat confusing due to the infinite alternative therapies and materials available. The objectives to be discussed within this article are as follows:
• The “fit” for the patient
• Timing or sequencing based on patient’s choice of treatment
• Immediate reline therapies after same-day implant surgery
• Scenarios for using soft-reline and hard-reline therapies
• Decision making on when to put implants to sleep when transitioning from fixed-appliance therapy to removable therapy
Step 1: The Fit
Patients usually have four set reasons for moving forward with treatment.1 They often attempt to balance what they perceive is best for them based on 1) what they believe is their chief concern, 2) how they feel the situation may be disabling them, 3) what will be the best benefit, and 4) how much the treatment will cost. Typically, cost is the most heavily weighted consideration. It is the responsibility of the dentist to redirect patients to what compelled them to make the appointment and help them understand their underlying problem. After the patient is made aware, the statement of consequences should be delivered: in other words, explain the situation and what can occur if it is left untreated.
Step 2: Treatment Sequencing
After the decision is made to surgically place dental implants, one must consider timing for the bone physiology for healing and when to proceed with the restorative phase after healing. The length of time required for soft-tissue healing is 6 to 8 weeks.2 Bone turnover and healing in the maxilla are approximately 16 weeks; in the mandible, the healing time is 12 to 16 weeks.3 The healing of an individual is dependent on health, genetic predisposition, and quality of bone in the maxilla or mandible. These parameters are the healing times or range to discuss with the patient before starting therapies.
After successful dental implant osseointegration, the restorative phase begins. This phase could occur as early as 3 months later or be delayed as long as 6 to 8 months, depending on the medical complexity of the patient, quality of the bone, and final restoration.4
Step 3: Existing Complete Denture as a Provisional and Soft Reline
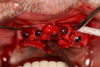
In the case of a male patient, after the initial steps, dental implants and cover screws were placed, and primary closure was accomplished (Figure 1 and Figure 2). The suturing was completed with polytetrafluoroethylene (PTFE) 4-0 sutures (Figure 2).
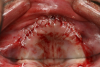
The process to provisionalize the maxilla immediately after surgery with the existing maxillary complete denture was accomplished by using soft-reline materials. To successfully reline the existing denture and create a satisfactory provisional, the borders of the denture should have a minimum of 2 mm of denture flange reduction as well as 1 mm of intaglio side base reduction. A microabrasion unit can be incorporated with this technique as well. After the denture was adequately reduced and abraded, the denture surfaces were conditioned to be relined with the soft bonding agent (Figure 3).
The soft-reline material was exceptionally easy to use. The bonding agent was painted onto the denture surface to be relined and allowed to bench dry. The patient’s mouth was dried before placing the denture and reline material into the mouth. The soft-reline material was dispensed through an impression gun, similar to an intraoral dental impression. The material was thixotropic, patient- and doctor-friendly, and predictable. The reline set in 5 minutes.
To eliminate a bad aftertaste for the patient, the denture should be washed with soap and water and an alcohol-based mouth rinse. Washing and rinsing of the denture and reline material with soap, water, and alcohol mouth rinse removes the air-inhibiting layer of the bonded reline material. The air-inhibiting layer is responsible for the aftertaste the patient may notice.
Removal of the denture is required for trimming excess material. Then it is rinsed and inserted back into the patient’s mouth, and occlusion is verified. The material can be used to functionally border the mold before sending to the prosthetics laboratory for reline processing. The author prefers this method over part A and B soft-reline materials due to ease and patient acceptance, as well as a more predictable and reproducible technique (Figure 4).
The critical step in this technique is how one uses the soft-reline materials after surgery. Sometimes the reline may need to be redone once or twice in a 12- to 16-week integration phase of implant healing. Properly reduced flanges and nicely rolled borders are important, along with complete palatal coverage in the maxilla. One must remove a significant amount of the denture flange, about 2 mm, creating a butt joint for the material to interface with the denture. Sometimes one may have to remove a little more denture base and encroach as far as the cementoenamel (CEJ) junction of a full denture. This process helps to reduce the force or tension of the muscles of mastication on the sutures by shortening the flanges. Longer flanges can disturb efforts to gain primary closure when there is an extended denture flange. Therefore, when performing implant dentistry after surgery and using a full denture as the provisional in conjunction with a soft-reline material, often there is 2 mm of reduction of the flange. It could range from 5 mm to 10 mm, and sometimes the dentist can get down to the CEJ with the teeth and the pink acrylic interface.
For a better end result with this technique and materials, a different suture material can be considered other than gut or silk sutures, which tend to maintain and hold bacteria at the surgical sites. PTFE sutures tend to be slippery, and the soft-reline material does not stick to the suture material. With placement of the implants, some bone grafting, and primary closure using PTFE sutures, one may see a nice end result when it is time to move to the restorative phase.
With the patient in occlusion, midline should be checked; the patient should be in light occlusal contact with the opposing arch while the reline material sets (Figure 5). This case proceeded well, supporting the patient’s existing denture and using the denture as a provisional immediately after surgery. The process met the patient’s objectives to have dental implant surgery, leave the office the same day with his smile, eat confidently, and have the treatment be affordable.
Step 4: Final Maxillary Restoration Conversion
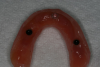
The images presented in this section (Figure 6 through Figure 10) are from the same patient, moving forward with the restorative sequence for converting his new open-palate removable complete denture, using abutments and internal denture housings to secure and stabilize the implant- and tissue-supported prosthesis.
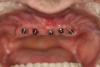
The treatment involved a horseshoe “snap-on” complete denture. The patient had been wearing the soft-reline provisional denture for 4 months. The dental implant integration phase developed very well. Nicely formed keratinized soft tissue completely surrounded the implant abutments, and initial stabilization was verified at the surgical placement appointment, along with the vertical torque values. Verification of torque values during placement of the abutments allows the final prosthesis restorative phase to begin (Figure 6).
The patient underwent the basic removable prosthetic appointments to create the functional and cosmetic objectives. He was confident and comfortable with all he undertook and was excited to complete his smile. He accepted the esthetics of his case. The prosthesis was finished in the laboratory and returned to the dental practice, with scheduling done to complete the conversion of the final prosthesis. The author used abutments and hard-reline material to capture the restorative housings that support the prosthesis.
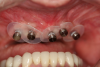
Vinyl blockout discs were placed over the abutments, and the restorative housings with nylon retention caps were positively secured to the abutments (Figure 7). In this case, only the intaglio side had reductions made to allow passive seating of the denture over the tissue and abutment/housing assembly, in light occlusion maximum intercuspation.
Midline position, occlusal plane, and smile line must be verified. After the clinician is satisfied with all check steps, conditioning of the intaglio side of the denture that is receiving the restorative housings can proceed. There are similar acrylic preparations as in the previous soft-reline procedure. At least 2 mm of clearance around implant restorative pieces should be allowed, along with microabrading if available, and conditioning of the areas receiving the hard reline with orthodontic or denture repair monomer. The monomer should be allowed to bench cure, and then the hard bonding agent should be applied, allowing air drying on the bench.
While the prosthesis bench dries, the patient’s oral cavity should be dried as best as can be achieved. The impression gun should be used to inject the hard-reline material into the prosthesis at the predetermined locations. After air drying the attachments intraorally, the hard reline should be injected sparingly over the restorative housings. The patient should be guided into light maximum intercuspation and midline verified. The material is thixotropic and will incorporate itself into the denture and around the undercuts of the housings. Care must be taken not to over-inject the hard reline under the blockout discs.
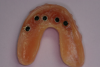
The set time is approximately 5 minutes. The patient may feel an exothermic temperature increase around the soft tissue, which is a normal occurrence. With an air/water syringe, a small amount of water should be injected into the oral cavity while the patient is in light maximum intercuspation. After the acrylic has set, the prosthesis should be removed. The intaglio side of the denture around the restorative housings should be observed to verify that there are no air bubbles or voids within the reline material (Figure 8). The final prosthesis should be polished, washed, and delivered to the patient. The housings in Figure 8 had the processing compression caps in place. If the patient requests greater retention, there are additional color-coded nylon compression caps to increase grip retention.
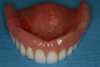
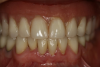
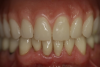
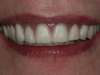
The end result was what the patient wanted. He felt comfortable and confident with his new smile (Figure 9 and Figure 10). The removable alternative met his financial objective as a budget-friendly smile makeover. While All-on-4® techniques are an exceptional means for creating a smile in a day,5 many patients are unable to afford such therapy. Removable prosthetic alternatives may serve a majority of those patients who are interested in achieving a more stable smile in a more cost-effective manner.
Step 5: Decision Making—When to Put Implants to Sleep
Occasionally, a clinician inherits a patient who has undergone sophisticated implant dentistry that would be considered “vintage.” Usually these patients have had multiple implants placed throughout their adult lives at different stages. That appeared to be the situation for this next case of a 75-year-old female patient (Figure 11). Her dental history included multiple dental implant systems used and restored with cement-retained porcelain-fused-to-metal single units and fixed partial dentures. Over time the restorations were not meeting her cosmetic values, and she requested implant dentistry alternatives to achieve her esthetic objectives.
The case presentation involved recreating a fixed and cemented restorative approach. However, the patient was not willing to pay the high treatment costs, so she decided on the “snap-on” removable implant- and tissue-supported open-palate prosthesis. Because of the decision to restore her maxillary arch with a removable approach, the question was how many implants were available to support the new restoration without compromising function and esthetics. This decision rests on the dentist and the laboratory helping to restore the case.
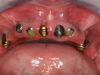
Figure 12 demonstrates the divergent and convergent angles due to different eras of implant dentistry over the patient’s past 25 to 30 years. The clinician must consider the number of implants to use and the number that will be put to “sleep.” Although the implants could have been removed, the patient strongly preferred a nonsurgical approach to achieve her goals. Nine implants were present in the maxillary arch; the decision was made to put six to sleep and restore the case using three dental implants with abutments to support the removable maxillary prosthesis.
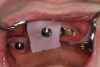
The patient presented to the office with an existing maxillary denture that was provisionally relined with a part A and B soft-reline tissue conditioner. The reline material was removed and the denture disinfected. Intaglio side 2-mm reduction and 2-mm flange reduction created a butt joint. Orthodontic monomer was painted on the intaglio receiving the hard-reline material (allowing time for air drying). The next steps were application of the hard bonding agent (allowing for air drying as well) and placement of blockout discs (non-latex rubber dam) over the implants, with the restorative housings securely placed over the abutments (Figure 13).
After all the bench work for preparing the denture was completed and the blockouts and housing secured, the patient’s mouth and restorative elements were dried. The hard-reline material was injected into the entire intaglio side of the denture. The denture was placed into the dried oral cavity. The patient was instructed to lightly bite into maximum intercuspation, with the clinician always being cognitive of the midline positioning and the passive seating of the denture. Five minutes later, the denture was removed for inspection of the reline and the accuracy of capturing the housings void-free. A small amount of trimming and polishing was required. The prosthesis was washed and disinfected, and then inserted back into the patient’s mouth, with midline and occlusion verified. Figure 14 shows the existing denture and preparation of flanges prior to the hard reline.
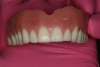
Figure 15 shows smooth and rounded denture flanges and a clean pick-up of the restorative housings incorporated void-free within the hard-reline material. The decision making for this case was complex because the patient wanted to do the least amount of dental therapy. Her decision to use her existing denture may not have been the best cosmetic choice, but it was in the realm of acceptability for her esthetic values (Figure 16). The reline and pick-up of the three attachments were successful. The reduction of the denture did not compromise the amount or strength of the existing prosthesis. Therefore, the denture base was kept to as thin of a profile as possible, which prevented a bulky upper lip and gummy smile. The hard reline completely filled the tissue-bearing surfaces. Its thixotropic nature kept the material where it flowed and was not a messy ordeal for the patient. The patient tolerated the entire procedure and was pleased to keep the therapy to a minimum in effort and cost. The patient objectives were met, as were those of the clinician.
Conclusion
Patients’ understanding of the “fit” is critical for them to experience full optimization of their oral health. After awareness is established and the patient accepts the situation, progress can be made. Timing and sequencing of treatment can be scheduled while considering the patient’s ability or willingness to pay for therapy.
Same-day surgical soft relines and hard relines of the final removable prosthesis are streamlined with either soft- or hard-reline injection systems. In the author’s experience, patients are pleasantly surprised by how easy the techniques have become, without a nasty aftertaste. Auxiliary staff members enjoy working with these systems, due to quick set-up and tear-down for the appointment.
These treatments are within the scope of any dentist with ability and knowledge regarding removable prosthetics, and they provide an alternative to help patients meet their objectives with removable appliances within implant dentistry. Putting implants to sleep allows patients to maintain the implants to use in the future if they change their mind and decide to move forward with fixed-implant dentistry.
References
1. Homoly P. Making it easy for patients to say “yes.” Homoly Communications website. http://paulhomoly.com/seminars-workshops-and-private-coaching/. Accessed June 6, 2017.
2. Sculean A, Gruber R, Bosshardt DD. Soft tissue wound healing around teeth and dental implants. J Clin Periodontol. 2014;41(suppl 15):S6-S22.
3. Christensen GJ. When to load an implant. http://www.dentaleconomics.com/articles/print/volume-107/issue-2/science-tech/when-to-load-an-implant.html. Accessed June 6, 2017.
4. Garfunkel AA. Dental implant therapy for medically complex patients. In: Babbush CA, Hahn JA, Krasuer JT, Rosenlicht JL, eds. Dental Implants: The Art and Science. 2nd ed. Maryland Heights, MO: Saunders Elsevier; 2011:86-97.
5. Algabri RS, Alqutaibi AY, Keshk AM, et al. Full mouth rehabilitation of completely edentulous patient with a screw-retained prosthesis: a case report with 4 year follow up. J Implant Adv Clin Dent. 2017;9(2):38-45.